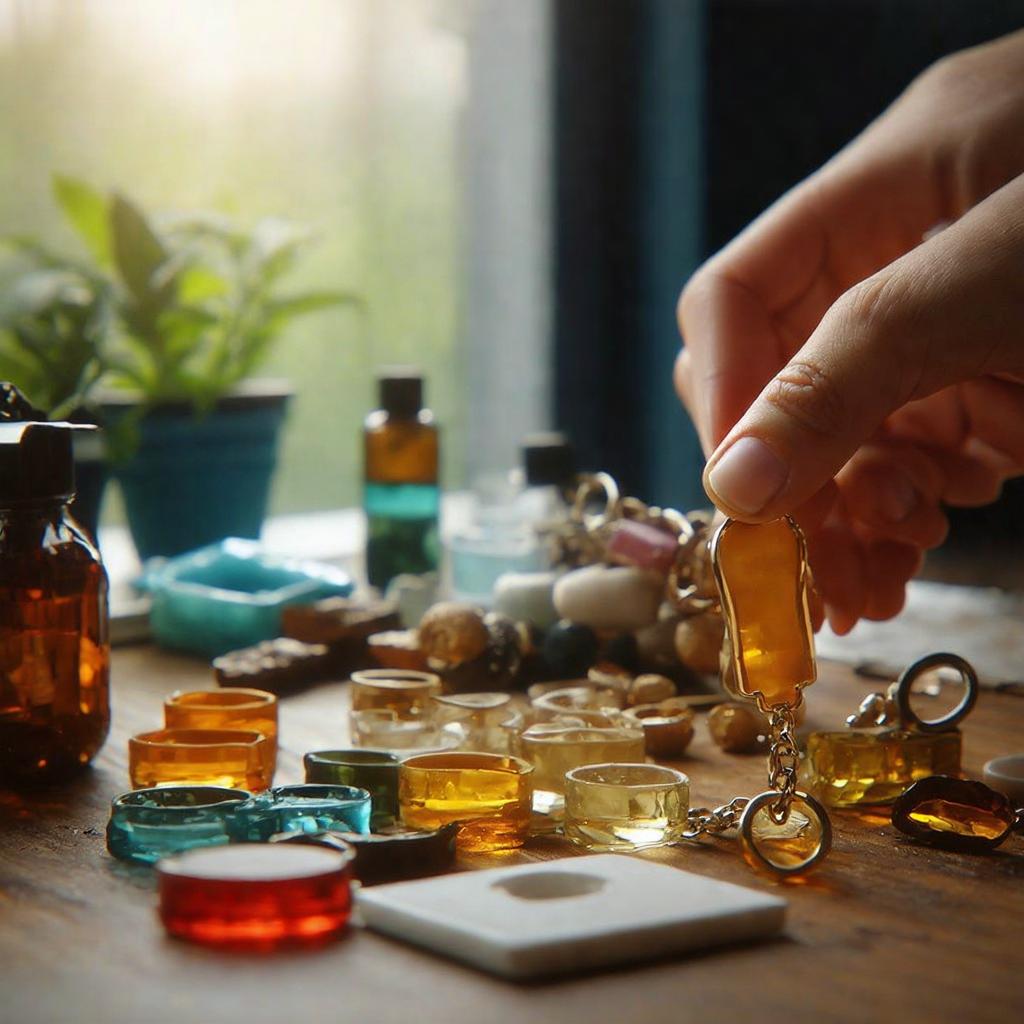
Resin keychains have taken the crafting world by storm, offering a unique way to preserve flowers, glitter, photographs, and creative designs inside a crystal-clear, durable shell. Whether you are a beginner crafter or an entrepreneur building a product line, understanding how to make resin keychains equips you with a skill that blends artistry and practicality. This guide covers everything from selecting the right resin to demolding and finishing, plus insights into professional manufacturing when you are ready to scale beyond your kitchen table.
What Makes Resin Keychains Special?
Unlike acrylic or metal keychains, resin pieces offer a distinctive depth and dimensionality. Objects suspended inside resin appear to float in glass, creating a mesmerizing visual effect. Additional benefits include:
- Total customization: Embed virtually any flat or small object, from pressed flowers to fabric scraps.
- Handmade appeal: Each piece carries slight variations that signal authenticity and care.
- Water resistance: Properly cured resin is waterproof and highly resistant to environmental damage.
- Color versatility: Pigments, alcohol inks, and mica powders create endless color combinations.
- Affordable startup: Basic supplies are inexpensive, making resin crafting accessible to beginners.
Essential Materials and Tools
Gather the following before starting your first project:
- Epoxy resin and hardener (two-part system)
- Silicone keychain molds in desired shapes
- Keychain hardware (eye screws, jump rings, split rings)
- Mixing cups and wooden stir sticks
- Respirator mask and nitrile gloves
- Heat gun or torch for bubble removal
- Pigments, glitters, or alcohol inks
- Inclusions such as dried flowers, charms, or paper cutouts
- Digital scale for accurate measuring
- Level work surface and silicone mat
- Sandpaper and polishing compound (for finishing)
Step-by-Step Guide: How to Make Resin Keychains
Step 1: Prepare Your Workspace
Resin crafting requires a well-ventilated, dust-free environment. Cover your work surface with a silicone mat or parchment paper. Ensure the room temperature is between 70 and 75 degrees Fahrenheit, as cold temperatures inhibit curing and cause cloudiness.
Step 2: Measure and Mix the Resin
Accuracy is critical. Use a digital scale to measure the resin and hardener according to the manufacturer’s ratio, usually 1:1 by volume or weight. Pour both parts into a mixing cup and stir slowly for 3 to 5 minutes. Scrape the sides and bottom thoroughly to ensure complete blending. Incomplete mixing leads to sticky, uncured spots.
Step 3: Add Color and Effects
Divide the mixed resin into smaller cups if you want multiple colors. Add pigments, inks, or glitter sparingly. A little goes a long way. Stir gently to avoid introducing excess air. For a galaxy effect, swirl complementary colors without fully blending them.
Step 4: Pour the First Layer
If you are embedding objects, start with a thin base layer of clear resin. Pour slowly into the mold to minimize bubbles. Use a heat gun or torch held several inches above the surface to pop any air bubbles that rise. Allow this layer to partially cure until tacky, usually 4 to 6 hours depending on the resin type.
Step 5: Position Your Inclusions
Place dried flowers, charms, photographs, or other items onto the tacky base layer. Press gently so they adhere but do not submerge completely yet. This prevents items from sinking to the bottom or floating to the top unevenly.
Step 6: Pour the Final Layer
Mix a second batch of resin and pour it over the inclusions until the mold is filled to the desired level. Again, remove bubbles with a heat gun or torch. Overfilling creates a domed surface; underfilling leaves edges exposed. Both can be aesthetic choices depending on your design intent.
Step 7: Cure Completely
Cover the molds with a dust cover or plastic dome to prevent debris from settling on the surface. Let the resin cure for 24 to 72 hours. Avoid moving or touching the molds during this time. Premature demolding can cause warping or fingerprint impressions.
Step 8: Demold and Finish
Carefully peel the silicone mold away from the cured resin. If edges are rough or sharp, wet-sand with fine-grit sandpaper (400 to 800 grit) and polish with a resin polishing compound for a glass-like shine.
Step 9: Attach Hardware
Drill a small pilot hole if your mold did not include one, or screw an eye pin directly into the resin. Attach jump rings and a split key ring. Test the assembly to confirm it holds securely under light tension.
Design Ideas and Inspiration
Once you master the basics, experiment with these popular styles:
- Floral Preservation: Pressed daisies, lavender, or ferns suspended in clear resin.
- Photo Keepsakes: Miniature portraits or pet photos sealed beneath a domed surface.
- Glitter Swirls: Holographic or chunky glitter mixed with translucent color.
- Layered Scenes: Multiple pours creating ocean waves, sunsets, or forest landscapes.
- Character Art: Hand-painted designs on a base layer, then sealed with a clear top coat.
- Memorial Pieces: A small amount of cremation ash or fur combined with calming colors.
Safety Tips for Resin Crafting
Resin is a chemical product that requires responsible handling:
- Always wear a respirator rated for organic vapors and nitrile gloves.
- Work in a ventilated area away from children and pets.
- Never pour leftover resin down the drain; let it cure in a disposable container and discard as solid waste.
- Use a dedicated set of tools; do not reuse resin utensils for food preparation.
- Store resin and hardener in a cool, dark place with lids tightly sealed.
Troubleshooting Common Problems
- Bubbles: Mix slowly, pour in thin layers, and use a heat gun immediately after pouring.
- Sticky Surface: Indicates incomplete mixing or incorrect ratio. Scrape and re-measure carefully.
- Cloudiness: Often caused by cold temperatures or moisture contamination. Warm resin before mixing and keep molds dry.
- Soft or Bendy Result: Allow longer curing time. Some resins require a full week to reach maximum hardness.
- Yellowing: Use a UV-resistant resin and avoid prolonged sun exposure.
Scaling Beyond DIY: Professional Resin Keychain Manufacturing
Handcrafting resin keychains is fulfilling, but producing consistent, defect-free pieces in large quantities is a different challenge entirely. Temperature control, bubble elimination, and color matching become exponentially more difficult as volume increases. Additionally, the time investment per unit makes handmade production economically impractical for wholesale or retail distribution.
Metal Crafts Pro provides industrial-grade custom keychain manufacturing that replicates the beauty of resin art with factory precision. Our services include:
- Injection and Casting: For designs that require uniform thickness and complex geometries.
- Epoxy Doming: A clear resin dome applied over printed metal or acrylic for a dimensional effect without the fragility of full-resin bodies.
- Color Matching: Pantone-accurate pigments ensure brand consistency across every batch.
- Embedded Printing: High-resolution images sealed beneath a protective resin layer for durability and clarity.
- Hardware Integration: Reinforced eyelets and rings tested for daily wear and tear.
Transitioning from handmade to professionally manufactured keychains allows you to focus on design and marketing while we handle production logistics, quality control, and global shipping.
Request a Quote for Custom Resin-Style Keychains
Frequently Asked Questions
What type of resin is best for keychains?
Two-part epoxy resin is the most popular choice for keychains due to its clarity, self-leveling properties, and strong cure. Look for formulas specifically labeled as crystal clear and UV resistant to prevent yellowing over time.
How long do resin keychains take to cure?
Most epoxy resins are touch-dry within 24 hours and fully cured within 72 hours. However, maximum hardness may take up to 7 days depending on ambient temperature and humidity.
Can I use fresh flowers in resin keychains?
No. Fresh flowers contain moisture that will cause cloudiness, bubbles, and failed cures. Always press and completely dry botanicals before embedding them in resin.
Are resin keychains durable enough for daily use?
Yes, when properly cured and finished, resin keychains are quite durable. They resist water, scratches, and minor impacts. However, they can crack if dropped on hard surfaces from significant heights.
When should I switch from DIY to professional manufacturing?
If you need more than 100 identical pieces, require Pantone color matching, or plan to sell through retail channels, professional manufacturing will save time, reduce waste, and deliver a more polished product.
Conclusion
Mastering how to make resin keychains opens the door to a deeply satisfying craft that produces beautiful, personalized accessories. From selecting the perfect mold to adding glitter, flowers, or photographs, every step allows for creative expression. Yet as demand grows, the limitations of home-based production become apparent. Partnering with an experienced manufacturer like Metal Crafts Pro empowers you to scale your designs without sacrificing quality. Whether you create one-of-a-kind gifts or build a full product line, resin keychains remain a captivating medium that turns simple ideas into wearable art. Contact us today to learn how we can support your next project.

